Powder Coat Spray Gun meets the demand from DIY enthusiasts, automotive hobbyists, and small workshop owners seeking tools to apply durable powder coatings on metal. These guns range from $80 for basic entry-level models to $400 for professional-grade options, fitting projects like refinishing old tools, restoring outdoor furniture, and customizing automotive parts. Finding the right Powder Coat Spray Gun ensures you get value and achieve smooth, long-lasting finishes.
Powder Coat Spray Gun works for projects of all sizes and purposes. For small DIY tasks—such as coating jewelry components, small hardware (like drawer pulls or cabinet knobs), or handheld tools—entry-level
Powder Coat Spray Gun ($80-$150) suffices, with lightweight designs that reduce hand fatigue during short sessions. Medium projects, including refinishing patio chair frames, bike parts, or automotive trim pieces, pair with mid-tier
Powder Coat Spray Gun ($150-$250) that feature adjustable spray patterns and 1-2 pound powder hoppers. Professional projects (custom metal signage, full automotive rims, or small-batch production of hardware) require high-end
Powder Coat Spray Gun($250-$400) with durable metal components, digital flow controls, and anti-clog systems. Each type of
Powder Coat Spray Gun is tailored to specific workloads, so you never pay for features you won’t use.
Powder Coat Spray Gun relies on proper surface preparation to ensure strong powder adhesion and a smooth finish. Start by cleaning the metal surface with a degreaser (many
Powder Coat Spray Gun kits include a compatible, travel-sized degreaser) to remove oil, dirt, and fingerprints—contaminants that break the bond between metal and powder. For surfaces with light rust or old paint, use 180-220 grit sandpaper (included in most
Powder Coat Spray Gun kits) to strip away imperfections and create a micro-rough texture, which helps the powder stick. After sanding, wipe the surface with a lint-free cloth to remove dust, then use compressed air (sold separately or included in premium kits) to clear tiny crevices. Some mid-tier and professional
Powder Coat Spray Gun kits add a pre-treatment spray to further boost adhesion, especially useful for high-wear items like tool heads or automotive parts. Even the best
Powder Coat Spray Gun will fail to deliver good results without thorough surface prep, so following these steps is key.
Powder Coat Spray Gun is a specialized tool designed to apply dry powder coatings to metal surfaces using electrostatic charge. Unlike traditional liquid paint spray guns,
Powder Coat Spray Gun uses a 10-25kV electrostatic charge to attract powder particles to the metal, ensuring even coverage across flat surfaces and curved details.
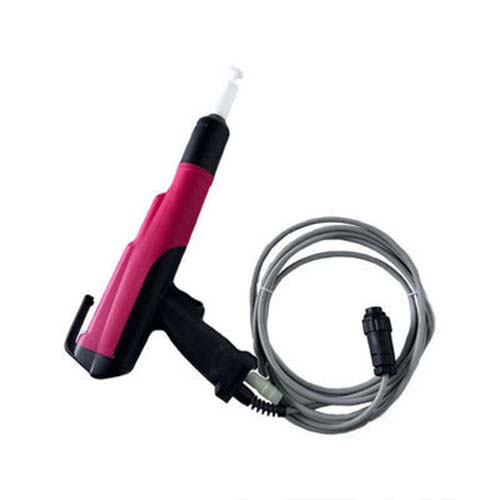
Powder Coat Spray Gun is typically sold in kits, which include the gun itself, a powder hopper (to hold the dry powder), safety gear (anti-fog goggles, a dust mask, and heat-resistant gloves), and basic cleaning tools. There are two main types of
Powder Coat Spray Gun: electric (no air compressor needed, ideal for home use) and pneumatic (uses compressed air, better for heavy-duty projects). Both types are engineered to be user-friendly, even for beginners, with simple controls that let you adjust powder flow and spray pattern.
Powder Coat Spray Gun Electrostatic Nozzle: The core component of the gun, responsible for generating the electrostatic charge and spraying the powder. Entry-level Powder Coat Spray Gun uses plastic nozzles with fixed spray patterns (narrow for detailed work like jewelry or bolts, wide for flat surfaces like toolboxes). Mid-tier and professional Powder Coat Spray Gun models have metal nozzles with adjustable patterns, allowing you to switch between tasks without changing tools. The nozzle also has a built-in filter to prevent large clumps of powder from blocking the spray.
Powder Coat Spray Gun Powder Hopper: A transparent, plastic or metal container that holds the dry powder and feeds it to the nozzle. Basic Powder Coat Spray Gun has a 1-pound hopper (enough for 2-3 small projects), while mid-tier and professional models have 2-3 pound hoppers—reducing the need for frequent refills. The transparent design of the hopper lets you monitor powder levels, so you never run out mid-project. Most Powder Coat Spray Gun hoppers also include a removable sieve to filter out clumps before they reach the nozzle.
Powder Coat Spray Gun Control Unit: A handle-mounted unit that lets you adjust key settings. Entry-level Powder Coat Spray Gun has a single dial to control powder flow (low, medium, high), while premium models add a digital display showing flow rate (in grams per minute) and a trigger lock for safety. The control unit also houses the power source—batteries for cordless electric models, or a connection port for corded electric or pneumatic models. The ergonomic design of the control unit reduces hand strain during long projects.
Powder Coat Spray Gun offers clear benefits over traditional coating tools and generic spray guns. Powder Coat Spray Gun delivers consistent results: its electrostatic technology ensures powder adheres evenly, reducing the need for touch-ups that waste time and material. Powder Coat Spray Gun is durable: even mid-tier models have reinforced parts that withstand monthly use, outlasting cheap generic guns that break after a few projects. Powder Coat Spray Gun is cost-effective: unused powder can be swept up and reused, cutting waste compared to liquid paint (which dries out or can’t be recycled). Powder Coat Spray Gun is versatile: it works on all common metals (steel, aluminum, iron) and supports various powder types (matte, gloss, metallic, textured), so you can use it for different projects. Finally, Powder Coat Spray Gun is user-friendly: kits include step-by-step instructions, and even beginners can achieve professional-looking finishes in their first few tries.
Choose the right Powder Coat Spray Gun for home projects by focusing on your typical project size and frequency. If you only tackle 1-2 small projects per month (like refinishing a set of drawer pulls or an old wrench), an entry-level electric Powder Coat Spray Gun ($80-$150) with a 1-pound hopper is perfect—it’s affordable and easy to store. For weekly projects (like restoring patio furniture or bike parts), opt for a mid-tier Powder Coat Spray Gun ($150-$250) with an adjustable spray pattern and 2-pound hopper—this lets you handle larger surfaces without refilling often. Check Powder Coat Spray Gun reviews for home-specific feedback: look for mentions of “easy setup” or “no clogs with basic powder,” as these indicate the gun works well for casual use. Prioritize kits: Powder Coat Spray Gun kits with included safety gear and a small bag of powder save $30-$50 compared to buying these items separately. Avoid professional Powder Coat Spray Gun models unless you plan to coat large items (like full-size automotive rims) regularly—they add unnecessary features (like digital controls) that increase cost.
Set up Powder Coat Spray Gun for first-time use in 10-15 minutes, even if you have no prior experience. Start by unboxing all components: Powder Coat Spray Gun, hopper, power cord (for corded models) or batteries (for cordless), safety gear, and instructions. Attach the hopper to the gun body: most Powder Coat Spray Gun uses a twist-lock design—align the notches on the hopper with the gun’s base and twist clockwise until it clicks (this ensures a tight seal that prevents powder leaks). Fill the hopper with powder, making sure not to exceed the “max fill” line (overfilling causes clogs). For corded electric Powder Coat Spray Gun, plug it into a standard outlet; for cordless models, insert fully charged batteries. Put on the included goggles and mask to protect against powder dust. Test the Powder Coat Spray Gun on a scrap piece of metal: hold the gun 6-8 inches from the scrap, pull the trigger, and adjust the flow dial until the spray is thin and even. If the spray is too thin (powders falls off the metal), increase the flow; if it’s too thick (drips form), decrease it. Once you’re happy with the test spray, your Powder Coat Spray Gun is ready for your main project.
Clean Powder Coat Spray Gun after each use to keep it working well and extend its lifespan. First, turn off the gun and disconnect the power source (unplug it or remove batteries). Empty any leftover powder from the hopper into its original airtight container—label the container with the powder color so you can reuse it later. Disassemble the hopper and nozzle from the Powder Coat Spray Gun (most models let you do this without tools). Use the cleaning brush included in the kit to scrub powder residue from the inside of the hopper, the nozzle opening, and the powder feed tube—pay extra attention to the nozzle, as clogs here ruin future spray patterns. Wipe the exterior of the Powder Coat Spray Gun with a dry, lint-free cloth—never use water, as it can damage the electrical components of electric models or cause rust on metal parts. Reassemble the Powder Coat Spray Gun only when all parts are completely dry—moisture causes powder to clump, which leads to clogs. Store the clean gun in a cool, dry place (like a garage cabinet) to protect it from dust and humidity.
Clogs are a common issue with Powder Coat Spray Gun, but they’re easy to fix without stopping your project entirely. First, turn off the gun and disconnect the power. Remove the hopper and check for clumpy powder—if the powder is moist (from humidity), spread it out on a dry paper towel for 5-10 minutes to dry, then sift it through the hopper’s sieve to break up clumps. Next, remove the nozzle from the Powder Coat Spray Gun and use the thin wire (included in most kits) to clear any powder stuck in the nozzle opening—be gentle, so you don’t scratch the inside of the nozzle (scratches cause uneven spray). Wipe the nozzle with a dry cloth to remove loose residue. Reattach the hopper and nozzle to the Powder Coat Spray Gun, then test it on scrap metal to make sure the clog is gone. To prevent future clogs, always sift powder into the hopper (even if it looks smooth) and avoid overfilling. If your Powder Coat Spray Gun clogs often, check if the sieve in the hopper is dirty—clean it with the brush or replace it (most brands sell replacement sieves for $5-$10).
Achieving a smooth finish with Powder Coat Spray Gun depends on technique and prep work. Start with thorough surface prep: clean the metal with degreaser, sand with 220-grit sandpaper, dry completely, and remove all dust—rough or dirty surfaces cause uneven powder adhesion. Apply thin coats: hold the Powder Coat Spray Gun 6-8 inches from the metal, and move it in slow, overlapping strokes (left to right or up and down). Apply 2-3 thin coats instead of one thick one—thick coats drip or bubble when cured. Let each coat sit for 1-2 minutes before applying the next—this lets the powder settle evenly. Cure the coated part correctly: follow the powder manufacturer’s instructions for temperature (usually 350-400°F) and time (15-20 minutes) using a heat gun or oven. Let the part cool completely before handling—this ensures the finish hardens fully. Practice on scrap metal first: this helps you get used to the Powder Coat Spray Gun’s weight and spray pattern, so you’re more confident when working on your main project. For curved parts (like bike frames or rims), tilt the Powder Coat Spray Gun slightly to follow the curve, keeping the distance consistent to avoid thin spots.
Safety is important when using Powder Coat Spray Gun, and following simple steps prevents accidents. Always wear the included safety gear: anti-fog goggles block powder dust from getting in your eyes, and a dust mask prevents you from inhaling fine powder particles (which can irritate your lungs). Work in a well-ventilated area—open garage doors or use a box fan to blow powder dust away from your work space. Keep Powder Coat Spray Gun away from water, especially electric models—water and electricity cause shocks. Never leave the gun unattended while it’s powered on, even for a few minutes. When curing coated parts with a heat gun, keep the gun moving—holding it in one spot for too long can burn the powder or warp thin metal. For oven curing, line the oven with foil to catch excess powder, and never cure parts in a kitchen oven used for food (residue can contaminate food). Let the Powder Coat Spray Gun cool down before cleaning or storing—its handle may feel warm after extended use, but it should never be hot. If the gun malfunctions (sparks, unusual noises, or no spray), turn it off immediately and disconnect power—contact the manufacturer for repairs instead of trying to fix it yourself.
Statement: Hangzhou Huaxiang Coating Equipment Co., Ltd Chinese Powder Coating Equipment facturers provide you with customized equipment for various types of Powder Coating Lines, Powder Coating Ovens, Powder Coating Booths,Powder Coating Guns, etc. For inquiries! Contact us at
Email: gezx@cncolourspray.com
WhatsApp: +86 13335812068

